We’ve been obsessed with SMASHbooks for quite some time now. You may recall one of our first blogs where we made our own SMASHbook planner. We still find ourselves watching that SMASHbook video every now and then. However, sadly, we must admit we haven’t been able to find the time to make our own proper SMASHbook. We did buy the books and put all our random mementos in a box, but that’s about as far as we got. Everything is just sitting on the shelf waiting to be SMASHed.
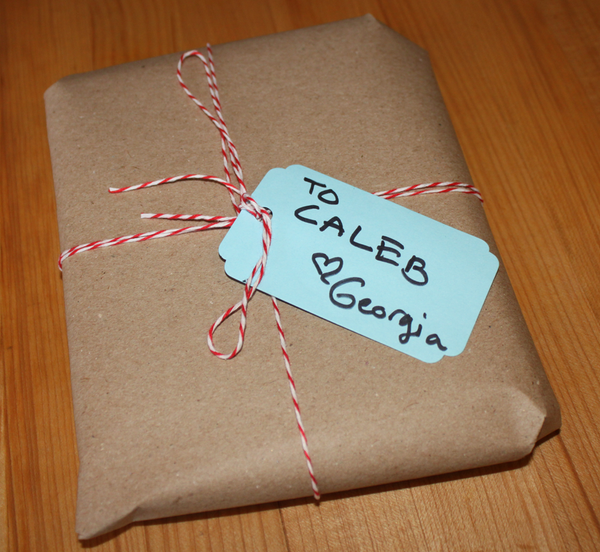
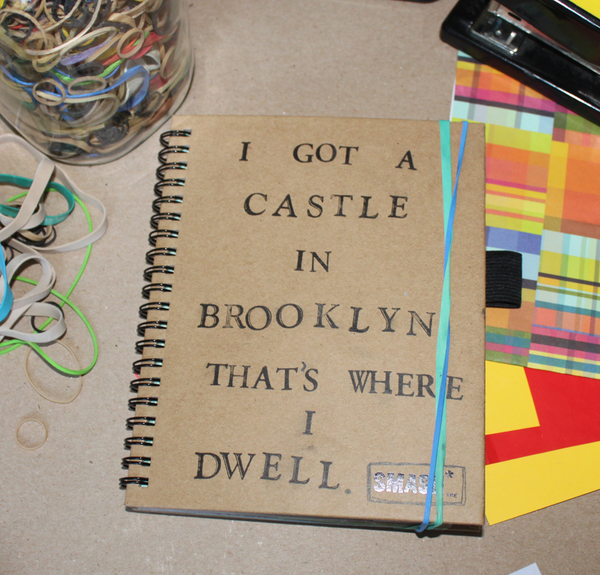
Luckily for our creative well-being we found a reason to create a SMASHbook. Although it was not for us, we thoroughly enjoyed making it. This book was a gift “from Georgia” to her friend Caleb who is moving away. We wanted to give Caleb & his mom a little token of their time spent in Brooklyn to treasure forever. When we saw this mini-SMASHbook at our soul-store Paper Source we knew it would make the perfect gift.
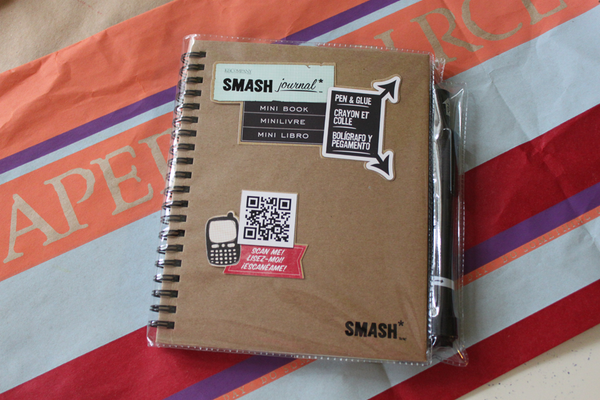
It still has 36 interesting unique pages to SMASH on, but it’s also a nice size for a gift. Living in Brooklyn, we’ve become very sensitive to big gifts. Our fear of burdening someone down with “stuff” has made us try to only give useful small presents. It will be easy to find a place for a gift this size. (5.5" wide x 7.5" high)
SMASHbook Goals:
Now that we’ve finished our first SMASHbook we wanted to share our top tips with you. First and foremost, the best part of making a SMASHbook vs. a scrapbook is that you can’t mess up. One of their mottos is “Messy & Beautiful.” As long the elements you use make you smile, you can’t mess up. So just have fun! There are 3 things you should keep in mind when creating a great SMASHbook in order to make it really stand out.
- Memories & Thoughtfulness (By including elements that will trigger specific memories, stories that mean something to you, and notes about why you love certain things, your SMASHbook will become something you treasure dearly.)
- Texture & Layers (Adding tickets, scraps, photos, or anything you can collect throughout life will add another dimension to your book. By using different flip, fold, and pocket techniques you will be able to include many more elements in your book vs. a typical scrapbook.)
- Fun & Surprise (Our favorite part of a SMASHbook is the element of surprise. By hiding and revealing different photos or notes makes looking through one interactive.)
Keepin’ It Real Tips:
As much as we’d love to create as organically and as effortlessly as the SmashVideo makes it appear, we know that video itself was pre-planned & produced. We also know better than to set ourselves up for frustration and we want to save you from it as well. Here’s our tips to enjoy the SMASHing process.
1. Get your supplies together. Having everything within reach makes the process go much smoother. (That being said – never limit yourself. We found ourselves walking to the art closet and the garage quite a few times.)
2. The Computer is your best friend. Printing out last minute photos or images from the internet can save you a lot of time and aggravation. The computer can also save you when it comes to checking your spelling.
3. Stash a trashcan nearby. This way you can immediately discard any scraps or packaging you don’t need.

4. Keep a neat workspace. We think this is important so your creativity can run free! However, we’re kind of a mess, so every so often we think you should take 30 seconds to reorganize everything. It makes a huge difference.

MESSY

ORGANIZED
Georgia’s SMASHbook to Caleb:
We wanted to share our gift with all of you as well, so you can hopefully be inspired to get SMASHing yourself! Please enjoy our first “Crafted by Love Jac” video, which flips through the whole book. Don’t’ worry, we sped it up & added music for your viewing entertainment. Also, below you’ll find a handful of pages we’ve highlighted. We breakdown our layouts, techniques, and materials. We hope you learn something new and get inspired to make your own SMASHbook for yourself or a friend! Enjoy.
the video:
Brooklyn SMASHbook Gift
(click link directly above to watch video)
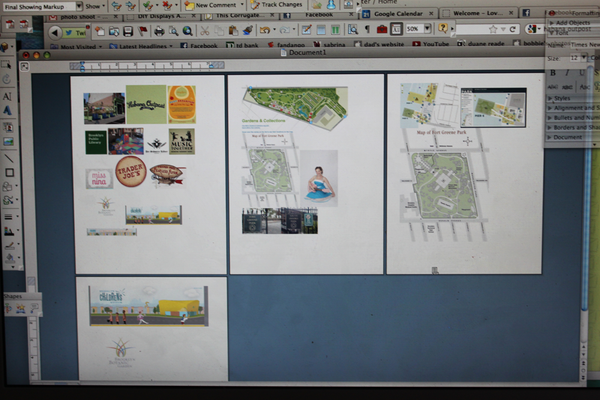
For a typical SMASHbook, the point is to collect things along the way. Since we didn’t think to make this book until many of the events had passed, we cheated and printed out a bunch of images from the internet. We stuck with logos and maps instead of photographs.

Since we were using this mini-SMASHbook, we developed our photos using the kiosk at CVS. It allows you get two 3x4s on a regular 4x6 photo sheet, costing the same as a regular 4x6. The option is under Collages then Mini-Prints. This size fit perfectly in our book.
We like to plan out our pages (maybe because we are planners), but we find it helps us focus. If you are making a book yourself, you can certainly just go for it and start SMASHing, but since this was a gift we wanted to be sure we had room for everything. We drew a simple grid on a piece of white paper, made notes of what the pages looked like, and then slotted in the different memories we wanted to include. This also allowed us to bounce between different pages without worrying we wouldn’t fit everything in.

FIRST PAGE:
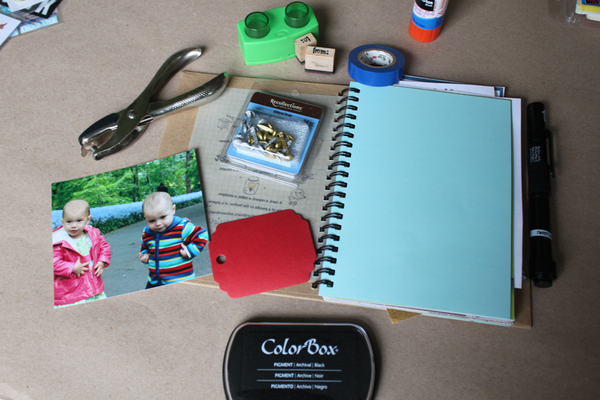

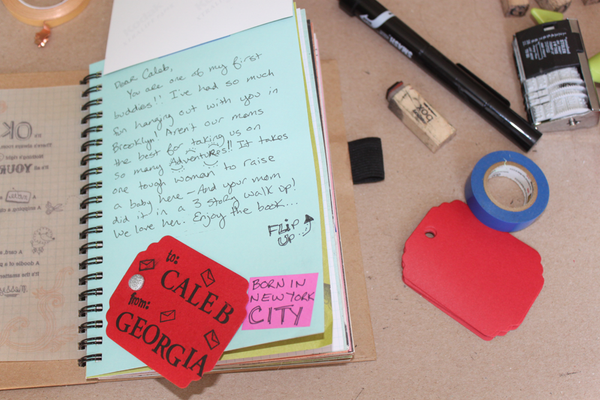
Since this is the first page you see when you open the book we wanted it to have a couple fun elements, as well as a place to write a personal note. We chose a photo of the kids together and used blue electrical tape to secure the photo in place as well as allow it to flip up to reveal our note. We love to use colored electrical tape to create flip elements because it’s strong, durable, and fun. We decorated a pre-punched red tag with stamps and poked a small hole in the page, then inserted a silver brad. The brad allows the tag to move down so that the photo can flip up. We used the SMASH pen to write this note as well as all the other notes in the book.
FORT GREENE PARK:

One of our favorite parts of a SMASHbook is that it allows you to record your own memories. Since this book was a gift, we wanted to leave room for Caleb’s mom to write down some of her own memories. We glued a photo of each kid at Fort Green Park, our local playground we visited almost once a day. We also printed out a park sign and a map that we included on these pages. We made a simple pocket with a piece of vellum paper and staples. The key to using staples to create a pocket was to make this page before the page previous to it, so that we could cover up the staples when we decorated the previous page, instead of having staples ruining a page we already created. We wrote a couple notes on the map itself, folded it, and inserted it into the pocket we decorated with sticker letters.
PHOTO SHOOT:

These pages are black and had a couple designs on them that we covered with our photos. We also used a silver gel pen to write on them so the words stood out. This page is about a photo shoot we went on separately, so I didn’t have any pictures of Caleb. To keep the memory we used the one picture of Georgia I had and another photo of our friends Shannon & Jacob who are the reason we got invited to the shoot. We also printed out the email from the photographer saying when the book will be out. We stapled the end, then folded it back, and secured it with a paperclip. We also used some fun metallic tape we had and some ABC stickers to add a little more interest to the photo of Georgia.
GREENLIGHT BOOKSTORE:
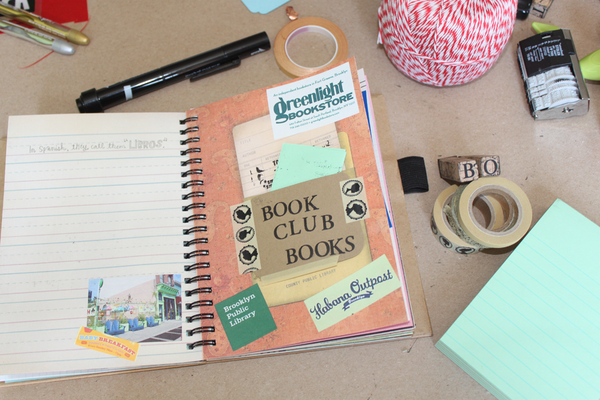
Greenlight Bookstore is not just our neighborhood bookstore; it makes Fort Greene the great community it is. They have children’s music and story time, book clubs, and book signings constantly. We chose these two pages for this memory because it was already “book” themed. – Thanks, SMASH! Caleb’s mom took full advantage of what Greenlight offers, so we left her a full page blank to write things down. We also made her a pocket with a piece of notepaper inside, so she could list all the books she read while they lived here. For this pocket we used fancy decorative tape because the page after it had already been decorated and we didn’t’ want the staples to show. We also love this fancy tape. Finally we printed a couple photos of Habana Outpost (which offers a great Baby Breakfast and is across the street from Greenlight) and the logo of Brooklyn Public Library because we spent some time there as well.
PIER 6:
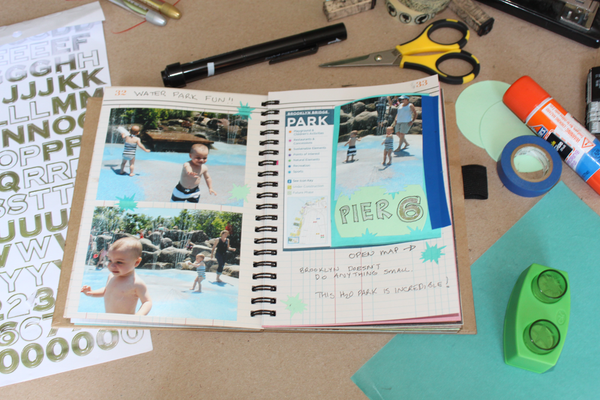
One of the best parts about raising a kid in Brooklyn is that when it gets hot outside all your favorite playgrounds turn into mini FREE water parks. Hands down the best water park is Pier 6. We glued a couple photos of the kids having the time of their lives on the left page. On the right page we glued a map of the park. Since the map was so long, we simply folded it over and used blue electrical tape to reinforce the fold. This also gave us another area to decorate. We used a piece of vellum, another photo, a punch-out. Finally we wrote a little note and then glued more vellum splat punch-outs all over the pages.
MISS NINA:

This page came with a great saying “Go Big or Go to the store and get some cupcakes,” but because of the pink we knew it was meant for one woman: Miss Nina. Miss Nina is a children’s music performer and local celebrity in our neighborhood – not to mention the biggest deal in our living room thanks to her amazing YouTube Channel. We first discovered her at our friend Mae’s birthday party, but you can also find her at Greenlight once a month and at other street festivals in the neighborhood. Thanks to Facebook, we found some pictures of Caleb & his mom at a Miss Nina event. We glued those down with the photo of Georgia & Miss Nina as our base. Miss Nina is known for two things in our house: her famous pink guitar and her fun, innovative songs. We wanted to be sure to preserve these memories. We used our guitar stamp on hot pink paper in honor of her famous pink guitar. We printed out photos of two books (Brown Bear, Brown Bear & Llama Llama Red Pajama) from our favorite Miss Nina songs & jotted down some of her key phrases. Finally, some internet photos mounted to the same hot pink paper finish the page nicely.
MUSIC TOGETHER:
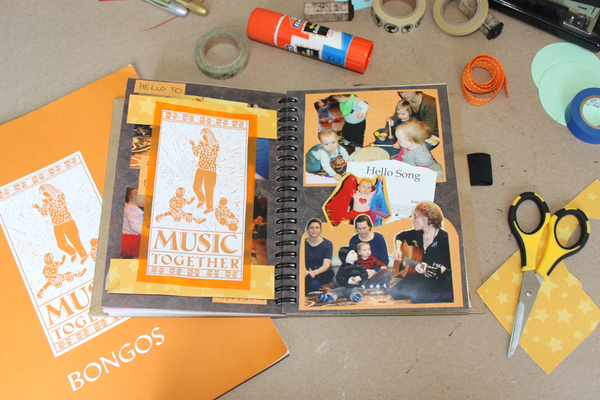

Music Together is a great music program in our neighborhood. These two pages were made possible thanks to my mother-in-law who came to a class and took a ton of photos & Music Together for giving us a song book at the beginning of the semester. Because we had so many elements to work with here, we knew we had to include many functions. We created a pocket with orange paper & staples (then covered the staples with a photo). We cut out the sheet music to their Hello Song (our favorite) to put inside. We also glued a photo of Georgia dancing with scarves to orange paper and tucked that in the pocket as well. For the right page we created a flap from the front of the Music Together book. When you open it, there’s more photos and some words from the Hello Song. Our teacher was Jessie & Georgia loved her!!
BEST FRIENDS:

For this page we choose a photo of Caleb & his mom from the Brooklyn Botanical Gardens. We used gold glitter stickers, brown paper, and the SMASHpen to create the saying “My Best Friend”. Underneath, we cut 4 slits in the page so that we could insert a note. It was important to plan this out as well. The slits are hidden on the previous page by the Music Together pocket we made. We left the right page blank so Caleb’s mom could right down her top 10 favorite things to do with Caleb in Brooklyn.
LEO:

For these two pages we actually had elements to use that we had collected. We cut a Brooklyn Industries sticker so it could frame the photo of Leo. We glued a clipping from the Brooklyn Paper to the page that already had a pigeon on it. We loved this page so much we didn’t want to cover it up. Instead, we hot glued some feathers to the pigeon’s wing to give it texture and make it stand out. We also thought a little outside the box for Leo’s name. We had these “saying” stickers that matched our color scheme, so we simply cut up the word LOVE and used the letters to spell out LEO.
LITTLE GYM:
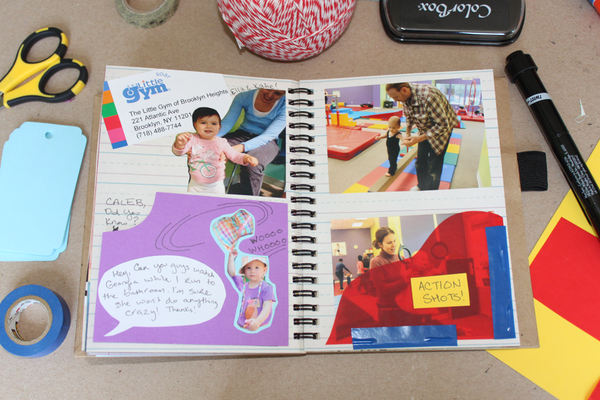
Ahh...The Little Gym…the place we originally thought was completely over-priced that turned out to be the best investment we’ve made so far!! We cut a piece of the brochure for the title of the page. Although Georgia & Caleb weren’t in the same class, we met up at plenty of open play times but, for some reason, we couldn’t’ find any pictures of Caleb. For this reason, we made a pocket for Caleb’s mom to insert some of her own action photos! On the left page we made a flap down that reveals a note to Caleb reminding him how great his parents are. For this flap, we taped on the inside so it was more hidden. We also cut the corner off the top paper to make it easier to flip down. On the front of the paper we recreated a funny moment that happened at The Little Gym by cutting a picture of Georgia to make it appear she was swinging her shorts around her head. (in real life there wasn’t time to take the picture – getting her pants back on was the first priority)
BUTTERFLY:

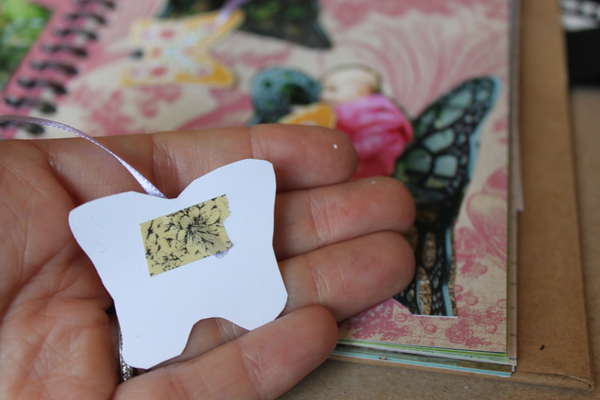
On the page about our trip the Botanical Gardens, we created a moveable element by cutting out butterflies from paper and taping them to some ribbon. We used decorative tape, so that when they flipped around it still looked pretty. We tied all three pieces of ribbon together, knotted them, and then slipped them through a small hole and secured it with more decorative tape.
CHILDREN’S MUSEUM:


These pages started out with some science images, so we figured it was the perfect place for our trip to the Children’s Museum. We printed the logo off the internet and used a couple photos from our visit. But our favorite element of the page is preserving the memory of when Hazel said “turtle”. For those parents out there that remember their kid’s first words, you know what a big deal this is. When Caleb’s Mom asked if Hazel could say “turtle” and she did we were all blown away!! We cut out a picture of Hazel and glued it to a piece of green paper and taped it to the page with a strip of a neon green sticker. When you flip it down, it reveals a stamped turtle on more green paper.
LAST PAGE:

Finally on the last two pages we chose this fun plaid paper (because it reminded us of many of Caleb’s pairs of pants), rounded it off, and stapled it to make two pockets. The other pocket is on the reverse side of this page. Holding them both there before you staple, allows you to only have to staple once! Thanks for taking the time to read to the bottom of this blog post. It is definitely our longest! Hope you enjoyed it and will be SMASHing soon!
3 comments
What a marvelous gift! Such time and effort will be cherished by the receiver forever more. I love all that you did, but the butterflies really caught my attention. Also, thank you for taking the time to stop by my little house blog to comment on mine, it’s very much appreciated.
Love this!!!!!
Dear Jac,
I love LoveJac….. What an extraordinary gift you are to inspire so many. I’m in the process of making a Baby book for Terry’s little boy Riky and your blog, video and instructions were exactly what I needed. Thanks for inspiring me… Your ideas are brilliant, and I’m not just saying that because I’m your Aunt. XOXOXOX