![]()
It’s official, the air has changed and our favorite season of the year has begun. With Labor Day behind us and the leaves starting to change we happily welcome the beginning of fall. Not only does fall include my birthday, but just one week later is quite possibly my favorite holiday: Halloween!
We decided to take a cue from Target, which greeted us with aisles of jack-o-lanterns and orange decorations, and get you excited early! Plus, this gives you a chance to start making your cards now. To our delight, Target wasn’t the only one getting in the spirit before October has even begun. This week we opened our mailbox to find the Halloween issue of Country Living Magazine staring back at us…and we immediately fell in love. A chevron pumpkin…Genius! We’ve been obsessed with chevron for a couple months now...right around the time when we found out designers don’t refer to it as zig-zags. We’ve seen it on the Nate Berkus Show and in many of the design books we’ve been reading. It can be used in everything…rugs, pillows, wall treatments, but to think to put in on a pumpkin….LOVE!!! Until we buy our pumpkin this year we decided to use it the best way Love Jac could…on a card.

Our favorite thing to do when starting to make our Handcrafted Cards is to gather all the supplies we can find that reminds us of the holiday or occasion we are crafting for. You never know what will inspire you. In this case we found some doilies that reminded us of spider webs and googly eyes that we thought we could use for a ghost. Since we fell in love with Country Living’s pumpkin, we knew we had to commit to the chevron pattern. After trying to wing it and then trying to use masking tape, we realized chevron was a very precise zig-zag and it was important to measure it out and make it right. Below are the instructions for making your own stencil. We hope it will help you craft some unique and beautiful cards.

1. Using thin cardboard to make your stencil, measure a grid with half-inch columns and rows. The height of your rows will determine the thickness of your line. We chose a half-inch because it visually was a good ratio to the size of our card stock.

2. We decided to make our chevron pattern one inch deep, which just means that we had to skip a line in the grid both vertically and horizontally when drawing our dots.

3. When drawing your dots, it’s easier to see the pattern if you make enough dots for one chevron stripe at a time. Connect the dots and then color in the stripe.

4. Now, draw the next set of dots, connect, and repeat until your cardboard is filled.
5. Because this is a stencil, you want to ensure it remains sturdy enough to use multiple times. Measure off a border and make sure you don’t cut past that.

6. Depending on where your border falls, you can decide to cut out either the black stripes or the white stripes. We cut out the white stripes. Use an xacto knife to cut the cardboard. Be sure you have a protective rubber matt underneath so you don’t ruin your table.
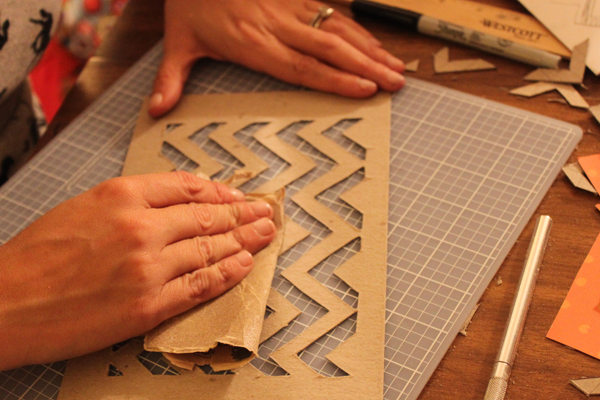
7. Once all your stripes are cut out, use sandpaper to remove any unwanted rough edges. Having bumps will take away from the smoothness of your pattern once you trace it.

8. Now you are ready to make your cards! Simply position the stencil over your cardstock. Be sure to hold it as steady as possible and trace the pattern with your writing utensil of choice. We went with a brush marker because of its even distribution of ink.
![]()
9. Since this is a Halloween card, we used stamps to add the word “Boo!” to the lower right corner.
Luckily for everyone, chevron isn’t holiday specific so be sure to save this stencil to make a fun card for any occasion!

Because we had so many other supplies out, we quickly made one other card design. Last year we bought this super cute candy corn stamp and since we were already using our brush markers, we made a couple of these cards as well. Here’s how.
1. Using an orange ink pad, stamp the candy corn design on the card stock, making a pattern on the top and bottom.
2. Once the ink has dried, use a yellow brush marker to fill in the third section of the candy corn.
3. Using alphabet stamps add a fun message to the front.
If you have any questions don’t hesitate to email us. We hope these ideas have motivated you to send out a card. We know Halloween doesn’t necessarily require a card, but we think making a card is a fun way to get your friends in the Halloween spirit! Have a great week.
1 comment
You inspire us……..