
Drum role please…..I finally finished my first Project Life Album!!! I am so excited to share this post with you because (1) I am in love with how it turned out, and (2) sharing it means I actually finished it. So, I must thank you for holding me accountable and helping motivate me!

You can watch a quick Flip-Through Video here!
BRIEF BACKSTORY:
I fell in love with the concept of Project Life as soon as I saw the promotional video on Becky Higgins’ website. I love to scrapbook, but it seriously takes so much time I find myself thinking about it a lot more than actually doing it. I have made a couple SMASHbooks recently (one for a friend & one for Georgia), but with Conroy here I knew I’d have even less time.
That’s the genius behind Becky Higgins’ Project Life! Simply put, it is a scrapbooking system that includes different plastic sleeves, in which you slip cards or photo to tell your story. No need to cut or paste! The thought is to devote one spread per week to your life and when the year is complete you have everything chronicled in one binder.

Since I discovered Project Life while I was pregnant with Conroy, I thought – done and done. I will make a Project Life of his first year and then, when he turns one, I’ll have his baby book all set! Then reality set in…I had an infant. As much as I tried to create folders and choose the pictures from the first couple weeks of his life, after about 6 weeks I found myself slipping (plus, I hadn’t even printed anything yet – let alone put it in a sleeve). I was ambitious and took a Big Picture Class ran by Elise Blaha Cripe, Annette Haring, and Megan Anderson. I learned a lot from them, but couldn’t find time to actually put something together. Next thing I knew it had been 3 months, then 9 months. By this point, I finally admitted to myself that it just wasn’t happening.
That’s when I came up with the idea to make a Summer Project Life Mini-Album. I figured you have to start somewhere – and the best time is now!

MY PROCESS:
The first thing I did was buy a mini-album and some pocket pages. I already had journal cards from the core kit I originally bought. I knew I had to start with the photos so I made a folder within iPhoto and the process began!
Overall, I found that I worked best by creating structure. Making the process more methodic kept me moving along and gave me specific times to get creative. I broke the entire process down into three major steps: (1) Photos (2) Cards, (3) Journaling & Embellishments, and then divided up each step within it.
PHOTOS:
I worked on the photos in three batches. (1) Before North Carolina, (2) Visiting North Carolina, and (3) the end of summer. Each time, I made one folder in iPhoto and dragged in all the pictures that I loved which told the story of our summer. I then went through that album and whittled it down a little. Then I’d take those photos and divide them into three separate folders…4x6s, 3x4s and 3x3s (since a lot of my photos were also Instagram photos). I used Photoshop to put two 3x4 photos on one 4x6 print. I did the same for the 3x3s. I then had them printed at CVS.

I would start by putting the photos in chronological order choosing between my two pocket page options (4 3x4s or 2 4x6s). I’d later go back and round the corners so that they matched the cards. Photos – Done!

CARDS:
I used the Sunshine Kit that Emma & Elsie from A Beautiful Mess designed. I love the bright colors in this kit. The core kits offer so many cards you don’t have to worry about messing up or wasting one. There are PLENTY! Off the bat, I took 11 cards and labeled them per week so I could keep track of what we did each week. I like the idea of using this in a regular project life book, but honestly I didn’t love it in my summer album. I ended up going back and re-writing the information a little neater because the messiness was really bothering me. At this point, I’m glad the information is in there for documenting’s sake, but honestly feel that a summer album would be ok without them. Adding the cards was enjoyable and relaxing. I simply flipped through the album and filled in the holes with cards that coordinated nicely.

Bonus: Traveling with the cards was so easy!
I added the first batch of cards while we were in North Carolina. Another great thing about the system Becky Higgins set up is that traveling with it is so easy. I loaded up my page pockets with multiple cards, so all I had to travel with is the mini-album itself. This also helped me contain my “mess” while we were staying at my in-laws.
JOURNALING AND EMBELLISHMENTS:
Getting all the photos and cards into the album felt like an accomplishment in itself. Now my reward was to enjoy the memories and make it pretty. I struggled initially with HOW I wanted to tell the story. I really enjoyed writing to Georgia when I made her the SMASHbook, but it just felt weird to write a lot in this book. After a little back-and-forth with my creative self, I decided to stick to using words or phrases to capture the memory. The cards in this kit work better when one embellishment is added or I glued white card stock over the patterned card. They make great backgrounds and are good for creating textured looks. I bought two sets of colored letters…aqua and yellow…plus, this fun Amy Tangerine sticker packet. I gathered all the wooden stamps I thought would be helpful, plus the Stazon ink pad Elise recommended. I set up a “journaling station,” shut the door to my office, turned on some music, and got lost in crafting! (This YouTube Mix was my go-to music playlist)

CHALLENGES:
Thanks to the format of this method of scrapbooking it was a lot simpler than staring at a blank sheet of paper. However, I ran into two big hurdles that I feel are pretty common. Here’s how I got through them…
Challenge #1: Too Many Photos

The second batch of photos I did back in Brooklyn. I was slightly overwhelmed because in addition to my regular iPhone photos, plus a few DSLR photos, I had all my mother-in-law’s photos. To say she likes to document life is an understatement. I like to joke that we can make a flipbook out of her photos. She always has her camera around her neck and that results in some of my all time favorite candid shots.
And with children - the truth is - sometimes you need to take almost a hundred photos to get a handful of good ones. Instead of letting this overwhelming feeling halt my progress, I decided to break this process down even more. Giving myself baby steps let me detach myself slightly. But, seriously, how do you delete a photo of your child – even a bad one? Instead of deleting, I decided I would make a folder and only add the pictures that “said something.” I next went back through and only allowed myself to keep three pictures from a certain activity. I still had too many, but I decided to just print these and then whittle it down even more. I laid all the photos out on the table and put them in order. Then I slipped them into the photo sleeves, eliminating more photos as I went. I would show my husband two photos and have him pick the one he liked best. Sometimes the only way to detach yourself emotionally is to literally give the decision to someone else. (Still, I couldn’t bring myself to throw them away, so I just put them in a little box to mail to friends….I might have a problem here!). Regardless – the photos were in the album and I checked that off as – DONE!

Challenge #2: Pocket Pages Overload
While we were in North Carolina I kinda went a little pocket page crazy! The store didn’t have Becky Higgins mini-albums, so I had to buy a couple other brands. The other brands offered many different layouts, which got me really excited!! (Later, I realized that the different layouts definitely made the process a little less simple – but I tried to embrace it and let myself be a little more creative). I wasn’t even planning on using these for the album, but when it came time to add the last batch of photos I was running out of pocket protectors. I did not want this to be the reason I didn’t finish the album so I forced myself to seriously focus.

I went through the photos on my computer screen and drew small sketches on post-it notes deciding what photo would go where. This amped up my “pre-production” but let me tell you, once the photos were printed it couldn’t have been easier to put the book together. I just matched everything up to my small, sketched post-it notes.


These new pocket layouts did make the “card” step much harder. I got out the paper cutter, my stack of card stock, and just took it page by page! – This again is the reason Becky Higgins set up her dividers the way she did. The last section of my album isn’t as cohesive as the beginning, but I have to admit I LOVE all the 2x2 pictures of our Carter Carolina Crunch work out and having just one photo be the focus of a page really makes me smile! Plus those pages also allowed me to write a little more!

WHAT I LOVE:
Now for the fun part!! At the end of the day, I’m a maker!! I love creating. I love photography and storytelling!! Here are the top three things I enjoyed most about making this mini-album!
LOVE #1: Finding my voice – documenting
As I said earlier, it took me a little bit to find my grove but, once I did, I was in heaven! My documenting style for this album was to highlight the moment with a phrase and elaborate on a couple when needed. Here are a couple of my favorites.
“Good thing she’s TOUGH and has a great dad.”

We must say this 50 times a day. Any time either of my children takes a spill we always help them up and say “Good thing you are tough.” It helps them know they are ok and can get through life. Also – my family motto growing up was “Conroys are smart and tough” so I feel like this is just one way I’m passing that strength down to my children. The story behind this photo is that Georgia stepped on a rock playing at the splash pad (I may have forgotten her water shoes). At first I wrote all that in a little story, but it was just making me sad thinking about her being hurt – so I chose to focus on the positive and redo the card with this saying!!
“I love [ ]” Cards & “Hello [ ]” Stamps

I really love these cards and stamps!! I used them several times throughout the book. I think they are simple and get right to the point. I love [Katie Erno]. I love [Elmo]. I love [food trucks]. I love [Baby Miles]. Hello [luggage]. Hello [beach]

“Ella” That’s What He Said!!
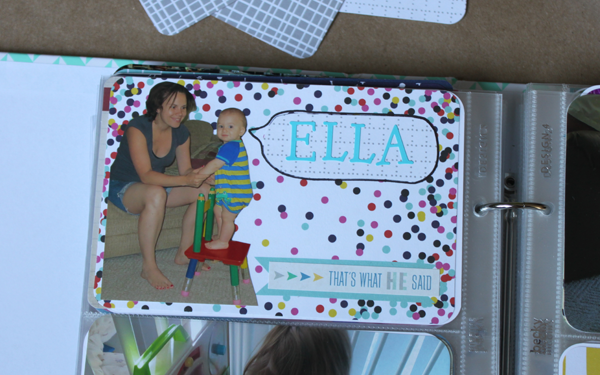 One of Conroy’s first words was “Ella.” Pretty sure he is trying to say “Elmo” but for over a month he’d point to everything and say “Ella.” This HAD to be recorded so I used the aqua letters and cut out a word bubble. Amy Tangerine’s sticker, “That’s what he said”, worked perfectly here!!
Folded Cards

Ok, the idea of the folded card is genius!! And truly helped me be completely honest and keep things looking cute! I only used a couple folded cards throughout the book, but there were some stories I really wanted to tell-- funny things Georgia said, reasons why I love certain people, the truth behind my experience at The Lazy 5 ranch, and my love for a mommy/daughter mani-pedi. I kept the front of these cards simple, with either a photo or a phrase, and then let it all spill out inside. Most people just flipping through the book won’t even think to pull the card out and open it, but it’s in there documented for those who want to read more!

Pre-numbered List Cards
The Sunshine Kit came with many cards that had numbers down the side. This was another chance to record some memories. We listed reasons we love school, qualities Georgia showed at Sesame Place, and our favorite Miss Nina songs.

“Let’s have a weekend with my favorite people in the world”

Towards the end of the album I used the different layouts to my advantage. I used the smaller squares to write a short quote and the single sheets to write more details of bigger events, such as meeting baby Emily and Molly’s wedding.

LOVE #2: Letting the Photos Speak for Themselves

While my husband was flipping through the album he must have said, “That’s my all-time favorite photo!” pointing to about every other photo. That filled my heart with happiness. Capturing an everyday shot of what life is really like is one of my favorite things. A photo can tell so much of the story on it’s own so I decided to let many of the photos do just that. I did try writing directly on a couple photos because I’ve seen that done and it can really look good, but I wasn’t loving it so I decided in this album I’d let the photos speak for themselves. (To fix my attempt at writing on the photos, I just tossed the original and reprinted the photo – super easy). Here are some of my all time favorite photos and why I love them.
On the Big Kid Swings

This photo of Georgia on the big kid swings makes me so proud. She didn’t hesitate at all and loved it so much, she went on twice.
MaMa Capturing the Moment

My favorite part of this photo of Conroy starting to walk is MaMa and her camera in the corner of the shot! It’s true that he gave his grandparents the best gift in the world by learning to walk at their house. Her pride is felt so much in this picture.
His Brave Little Girl


These two photos make me so happy. Our little girl was so brave and rode on the raft all the way out to the middle of the lake. She didn’t think twice when the big kids asked if she wanted to go!! She’s doing her “Miss America” wave and beaming with pride! The second best part of these photos is Chad - standing up on the boat that is pulling the raft. He’s got the stance George Washington had when crossing the Delaware. He was like Michael Phelps at the ready waiting to dive in and win a gold medal. That little girl is his world. He constantly simultaneously encourages her to do anything and everything while protecting her from anything and everything!
Ikea Sums Up Our Life

Oh my goodness! This photo from Ikea!! Often Ikea is our go-to escape. We make a day of it, have lunch, and do some browsing. I’d say 90% of our visit is joy, 10% of the visit is a little chaotic. This photo captures that 10%. The family bathroom has this seat on the wall so an adult can use the bathroom while the child is safe. I have no idea why it’s so high on the wall. I couldn’t NOT put Conroy in the seat while Georgia used the potty (with her travel potty seat of course). This is my life right now. You just gotta laugh sometimes.
Concert in the Park

These two photos from the park are also some of my favorites. Georgia looks like a teenager listening to the coolest band. The photo underneath was taken by my friend on our way to her house after the concert. This is how we roll these days – everyone looks out for each other’s kids and we travel in a pack. The shadows from the trees might be in our faces, but the fact that I had four kids on this crazy stroller just makes me so happy.
LOVE #3: This album is done
I feel so accomplished that this album exists. I’m so glad I put in the time after the kids went to bed and on weekend while my husband took them to the park. It didn’t happen overnight but took way less time than a typical scrapbook. Thank you for letting me share it with you. I am starting one for this year (Sept 2014 – August 2015) and I already have some great ideas!

Going forward I will be sharing some of my Project Life once a month!! If you have any questions or any suggestions, feel free to comment below or email me directly (jac@lovejac.com)!! Hope you enjoyed the glimpse at our summer album as much as I did putting it together.
Watch a quick Flip-Through Video Here